# Alibaba Cloud ECS
Due to the COVID-19 pandemic, Alibaba Cloud has introduced the “Study from Home” program, offering free cloud servers for 6 months to college students and teachers.
With the continuous advancement of COVID-19 prevention and control, in order to fully cooperate with the Ministry of Education in postponing the start of the new semester, teachers and students are taking online classes at home to fight against the epidemic. Alibaba Cloud Elastic Computing, in collaboration with the developer community and Alibaba Cloud Academy, has urgently launched the “Study from Home” program for colleges and universities across the country, providing free 2.68 billion hours of cloud server ECS computing power, as well as diverse online courses and other resources.
So, what is ECS (Elastic Compute Service)? It’s basically a virtual server, different from VPS (Virtual Private Server) as it’s not based on a dedicated server. Therefore, as long as you have the money (fog), you can upgrade configurations anytime to meet your ever-changing performance needs.
After learning about this opportunity, I promptly applied for an ECS instance. The performance was decent with Intel Xeon x2 + 4GB RAM. However, studying is out of the question; only playing Minecraft can sustain life. Thus, I naturally transformed this server into a Minecraft Vanilla server.
# Configuring Instance Security Group
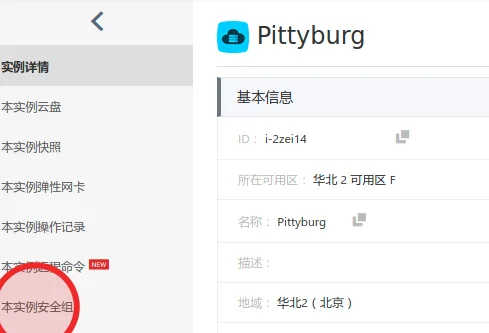
Since I directly set up the Minecraft server on the default port 25565, the first step is to open the inbound rule for port 25565 TCP in the Alibaba Cloud security group. First, go to the instance page and access the current instance security group for setup, as shown below.

Next, click on “Create Manually” under In Rules for Access.

Enter the Minecraft port information and save.

# Configuring Server
I opted for Debian 9.9 x64 on the system.
# Downloading Server
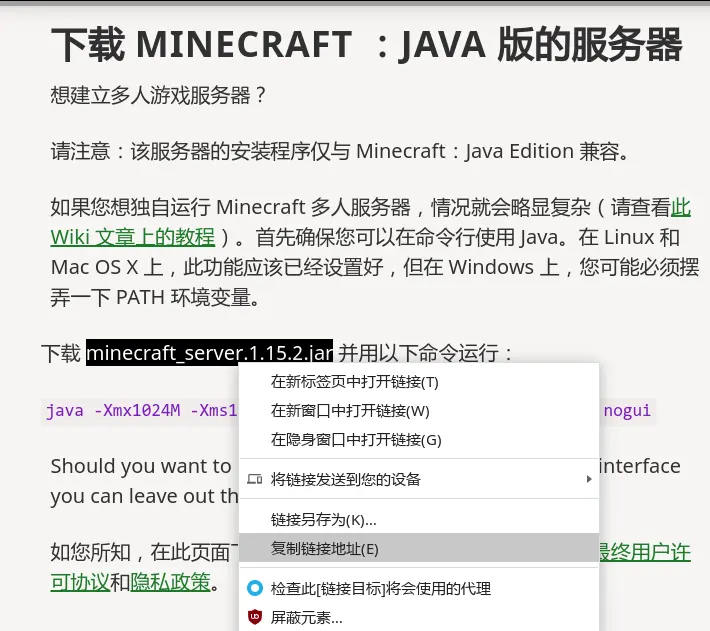
First, find the server download link on the Minecraft official website.

Next, SSH into your server and create the /srv/minecraft folder with the following command and download the server file.
mkdir /srv/minecraft # Create a minecraft folder
cd /srv/minecraft # Move to the folder above
# Use wget to download the server; replace the link with yours, the example here is for server 1.15.2
wget https://launcher.mojang.com/v1/objects/bb2b6b1aefcd70dfd1892149ac3a215f6c636b07/server.jar
# Installing Java and Screen
First, update the software sources and system.
sudo apt update && sudo apt upgrade
Then, install OpenJDK 8 and screen. OpenJDK is essential for Minecraft to run, while screen is a session management software in Linux that ensures sessions continue running even after SSH disconnection.
sudo apt install openjdk-8-jre-headless screen
Note: Minecraft 1.13 and above are only compatible with OpenJDK 8. If there are remnants of OpenJDK 7 on your server, uninstall them using
sudo apt remove openjdk-7-\*.
# Initial Startup
Use the following command to start the server for the first time.
java -Xmx2048M -Xms3572M -jar server.jar nogui
# -Xmx min memory -Xms max memory nogui run in command line mode
The initial startup will quickly exit, requiring your agreement to the EULA.
nano eula.txt # Open the agreement file with nano editor
Set eula=true to indicate your acceptance of the EULA agreement:
#By changing the setting below to TRUE you are indicating your agreement to our EULA (https://account.mojang.com/documents/minecraft_eula).
#Fri May 08 12:30:29 CST 2020
eula=true
# Setting Up Bash Script
You wouldn’t want to enter the above code every time you start the server. This is where scripts come in handy.
Create a new run.sh script file in the current folder.
touch run.sh # Create run.sh file
nano run.sh # Edit run.sh file
Modify the content of run.sh as follows:
#!/bin/sh

java -Xms2048M -Xmx3572M -jar server.jar nogui
Here, I used 2048M for minimum memory and 3572M for maximum memory; you can adjust according to your preference.
Make run.sh executable:
chmod +x /home/minecraft/run.sh
Then, create a new session with screen and start the Minecraft server.
screen ./run.sh # Run the bash script in a new session
# or
screen -S "Minecraft" # Create a new session named "Minecraft"
./run.sh # Run the script
Your server will start running, and when you see done, it means the server startup is complete.
Now you can shut down the server, modify the server.properties in the same directory to disable authentication, configure map seed, adjust game difficulty, or activate whitelist.
# Main configurations:
white-list=true # Enable whitelist
difficulty=easy # Set difficulty level
max-players=20 # Set maximum players
online-mode=false # Disable authentication
For more settings, refer to the Minecraft Wiki.
# Adding Whitelist
After starting the server, you can add players to the whitelist in the background using the command whitelist add Name. However, sometimes even after adding to the whitelist, players may not be able to join due to case sensitivity or mismatched UUID. In such cases, you can manually edit whitelist.json.
nano whitelist.json # Edit whitelist.json with nano editor
Modify the information in the JSON, changing the UUID to the id from the failed login information in the background, and the name to the player’s name.
# JSON Example:
[
  {
    "uuid": "ba5d0d26-54b5-3e43-a4de-xxxxxxxxxxxx",
    "name": "GHModius"
  },
  {
    "uuid": "55b632d1-44f6-3116-asdd-xxxxxxxxxxxx",
    "name": "ParkMoonJ"
  }
]
Refresh the whitelist in the background:
whitelist reload
This way, players should be able to log in successfully.
# Conclusion
Setting up a Vanilla server is quite straightforward. Just remember not to play too much and don’t forget about your mid-term assignments!