# New Words
The last time I picked up the pen was on October 29th, and before I knew it, a whole month of January has already passed.
# New Phone
My companion for three years, the Xiaomi MIX 3, slipped out of my old high school uniform that I hadn’t worn in a long time one careless morning, and crashed heavily onto the cement floor, screen down.
If it were a person, the impact probably would have been on the back of the head, with the final diagnosis presumably being a vegetable. Unlike typical cases, perhaps the deadline isn’t forever, but until the day I transplant a new screen for it.
That evening, I went to the nearest Apple Store and reluctantly bought the iPhone 13 at the original price of 5999.
As to whether or not there was hesitation about it not being available when it was launched in September, now no “person” is hurt, but I digress.
# New Photos
My love for photography started around the summer. The storage space on the MIX 3, which was mostly available before the summer began, has now been largely used up, with a few bumps and bruises along the way. Google Photos’ 15GB is also running low.
Glancing at the 5GB iCloud storage space and the new photos taken on the iPhone, it seems there is no proper place to store them.
# New NextCloud
Finally, my gaze fell upon the NAS, with its nearly infinite storage space, seeming like the best choice to preserve memories. Automatic backup apps on the iPhone, including Möbius Sync, Photo Sync, and Resilio Sync.
- Möbius Sync is a third-party Syncthing client, with Syncthing’s reliability being superior, but after synchronization, it’s impossible to view photos remotely, especially Live Photos, which is a fatal flaw.
- Photo Sync is a subscription-based paid software, costing 6 RMB per month, making iCloud services obviously a better choice.
- Resilio Sync has received some criticism for its stability, and similarly, it does not well support Live Photos.
It seems like NextCloud is the optimal solution, not only for storing photos but also for automatic background backups. The web client allows me to access my files anytime, anywhere without having to open an SFTP client.
It’s worth mentioning that I can even directly watch videos downloaded with Aria in NextCloud by mounting an external folder (although 80% of them cannot be decoded in my iPhone client).
# Deployment

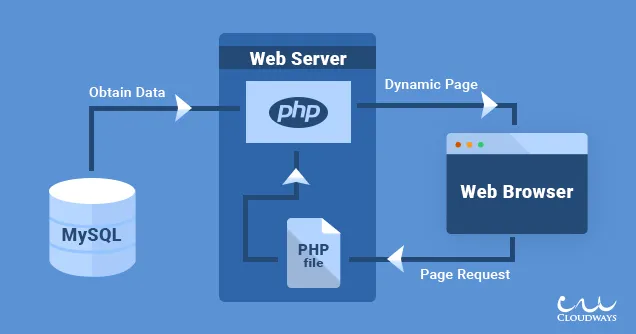
NextCloud is implemented using PHP, and the image above excellently illustrates how the server responds when accessing a PHP application.
During this process, a network server is needed to receive user requests and find the files the users need based on the requests. If there are PHP scripts in the files, they are sent to the PHP compiler for processing. During processing, the compiler may access the database for storage and retrieval. It then returns the processed web data to the network server, which is then transmitted to the user.
In this process, there are four key components: the network server, PHP scripts, PHP compiler, and database. As usual, we will use Caddy for the network server, NextCloud for PHP scripts, we will utilize PHP-FPM for faster processing, and we will use PostgreSQL for the database.
# User Creation
First, update the package lists and existing packages:
sudo pkg update -f && sudo pkg upgrade
Then create a user that will be used to run Caddy and PHP-FPM and will have the authority to manage NextCloud code files. I used the username caddy for this purpose:
sudo pw useradd -u 1003 -g caddy -m -d /usr/local/etc/caddy -s /usr/sbin/nologin -c "Caddy web server" -n caddy
# NextCloud Server Files
Since NextCloud is essentially a website composed of web pages and script files, its installation and updates are as simple as unpacking the files.
First, download the server files from the official NextCloud website here.
Then unpack the downloaded compressed file:
sudo mkdir -p /usr/local/www
mv /path/to/nextcloud.tar.bz2 /usr/local/www
cd /usr/local/www
tar -xzvf /path/to/nextcloud.tar.bz2
All NextCloud code files should now be unpacked into /usr/local/www/nextcloud. Next, transfer all the unpacked files to the server user created earlier and assign the correct permissions:
sudo chown -R caddy nextcloud
sudo chmod -R 750 nextcloud
# Caddy
Next, configure Caddy. First, download Caddy’s binary file from the official website here, making sure to select the correct operating system and required modules. For example, as port 443 was unavailable in my network environment, I used the caddy-dns/dnspod module to obtain an SSL certificate via DNS challenge.
Then move the downloaded Caddy binary file to /usr/local/bin:
sudo mv /path/to/caddy /usr/local/bin/caddy
Create a new Caddy service file:
#!/bin/sh

# PROVIDE: caddy
# REQUIRE: NETWORKING
# KEYWORD: shutdown

. /etc/rc.subr

name=caddy
rcvar=caddy_enable

load_rc_config $name

: ${caddy_enable:="no"}
: ${caddy_user:="caddy"}
: ${caddy_group:="webmaster"}
: ${caddy_conf:="/usr/local/etc/Caddyfile"}
: ${caddy_envfile:="/usr/local/etc/caddy.env"}
: ${caddy_pidfile="/var/run/caddy/caddy.pid"}

pidfile=${caddy_pidfile}
command="/usr/sbin/daemon"
command_args="-P ${caddy_pidfile} -r -f caddy run --envfile ${caddy_envfile} --config ${caddy_conf}"

run_rc_command "$1"
When using rc.d, Caddy cannot recognize $HOME correctly, so you need to manually create caddy.env to point Caddy towards how to store configuration files and certificates:
# /usr/local/etc/caddy.env
XDG_DATA_HOME=/usr/local/etc/caddy
XDG_CONFIG_HOME=/usr/local/etc/caddy
Next, create the Caddyfile:
# /usr/local/etc/Caddyfile
{
  # If ports 80 and 443 are not available, consider turning off automatic HTTPS redirection
  auto_https disable_redirects
  # Store logs in /var/log/caddy.log
  log {
    output file /var/log/caddy.log
    format console {
      time_format wall
    }
  }
}

# Change next.yourdomain.com to your domain or IP address
next.yourdomain.com {
  root * /usr/local/www/nextcloud
  file_server
  php_fastcgi unix//var/run/nextcloud.sock {
    # Beautify URLs, hide PHP file names in links
    env front_controller_active true
  }
  # Enable HSTS
  header {
    Strict-Transport-Security "max-age=15768000;includeSubDomains;preload"
  }
  redir /.well-known/carddav /remote.php/dav 301
  redir /.well-known/caldav /remote.php/dav 301
  # Block access to the following system files
  @forbidden {
    path /.htaccess
    path /data/*
    path /config/*
    path /db_structure
    path /.xml
    path /README
    path /3rdparty/*
    path /lib/*
    path /templates/*
    path /occ
    path /console.php
  }

  respond @forbidden 404
}
Create the log file and adjust permissions for the Caddy-related files:
sudo touch /var/log/caddy.log
sudo chmod 755 /usr/local/etc/caddy/Caddyfile /usr/local/etc/caddy/caddy.env /var/log/caddy.log
sudo chown caddy:caddy /usr/local/etc/caddy/Caddyfile /usr/local/etc/caddy/caddy.env /var/log/caddy.log
Once the configuration is done, start the Caddy service.
sudo sysrc caddy_enable=YES
sudo service caddy start
# Use the following command to view Caddy logs for troubleshooting
tail -f /var/log/caddy.log
# PHP
Now that we have a file server, we need a compiler to handle PHP files, which is the PHP software package.
Simply install the PHP software package through pkg:
sudo pkg install php80 php80-bcmath php80-curl php80-dom php80-fileinfo php80-filter php80-gd php80-gmp php80-intl php80-mbstring php80-opcache php80-openssl php80-pcntl php80-pdo php80-pecl-imagick php80-posix php80-session php80-simplexml php80-xml php80-xmlreader php80-xmlwriter php80-zip php80-zlib
These are the PHP software packages and modules required for NextCloud. Once installed, some simple configurations are needed. First, create a PHP-FPM configuration file:
# /usr/local/etc/php-fpm.d/nextcloud.conf
[nextcloud]
user = caddy
group = caddy
listen = /var/run/nextcloud.sock
listen.owner = caddy
listen.group = caddy
pm = dynamic
# The following limits the server's thread count; adjust as needed
pm.max_children = 128
pm.start_servers = 32
pm.min_spare_servers = 32
pm.max_spare_servers = 64
pm.max_requests = 500
Then create a PHP configuration file:
sudo cp /usr/local/etc/php.ini-production /usr/local/etc/php.ini
It is recommended to modify the following sections in php.ini:
; Increase memory to 512MB as recommended by NextCloud
memory_limit = 512M
; Set the default timezone
date.timezone = Asia/Shanghai
; Set the login session storage location
session.save_path = "/tmp/php"
; Use PHP's opcache cache, uncomment to enable
opcache.enable=1
opcache.memory_consumption=128
opcache.interned_strings_buffer=8
opcache.max_accelerated_files=10000
opcache.revalidate_freq=1
opcache.save_comments=1
Create a session storage directory; without this, you won’t be able to log in:
sudo mkdir /tmp/php
sudo chown caddy:caddy /tmp/php
sudo chmod 750 /tmp/php
Once configured, start PHP-FPM:
sudo sysrc php_fpm_enable=YES
sudo service caddy restart
sudo service php-fpm start
# PostgreSQL Database
As of the time of writing, the PHP module on FreeBSD 13.0 that accesses PostgreSQL supports up to PostgreSQL 12.8 only. Therefore, we temporarily cannot install the latest PostgreSQL 13.
Let’s start by installing PostgreSQL 12.8 and the PostgreSQL-related modules for PHP 8.0:
sudo pkg install postgresql12-{server,client} php80-{pdo_pgsql,pgsql}
Run the PostgreSQL service:
# Enable PostgreSQL service in rc.conf
sudo sysrc postgresql_enable=YES
# Initialize the database
sudo service postgresql initdb
# Start the database service
sudo service postgresql start
Next, create the database user and tables:
# Log in to the postgres account, which initially has the authority to manage databases
sudo su - postgres
# Create a database user "nextcloud" with the ability to create databases (createdb) and set a password for access (pwprompt)
createuser --pwprompt --createdb nextcloud
# Create the NextCloud database "nextclouddb" using the template and set the owner to the newly created nextcloud user
createdb --owner=nextcloud --template=template1 nextclouddb
# Exit the postgres account
exit
# Initializing NextCloud
First, create a directory to store user files. This directory should be an empty directory and owned by the user running NextCloud.
sudo mkdir /path/to/data/directory
sudo chown caddy:caddy /path/to/data/directory
sudo chmod 770 /path/to/data/directory

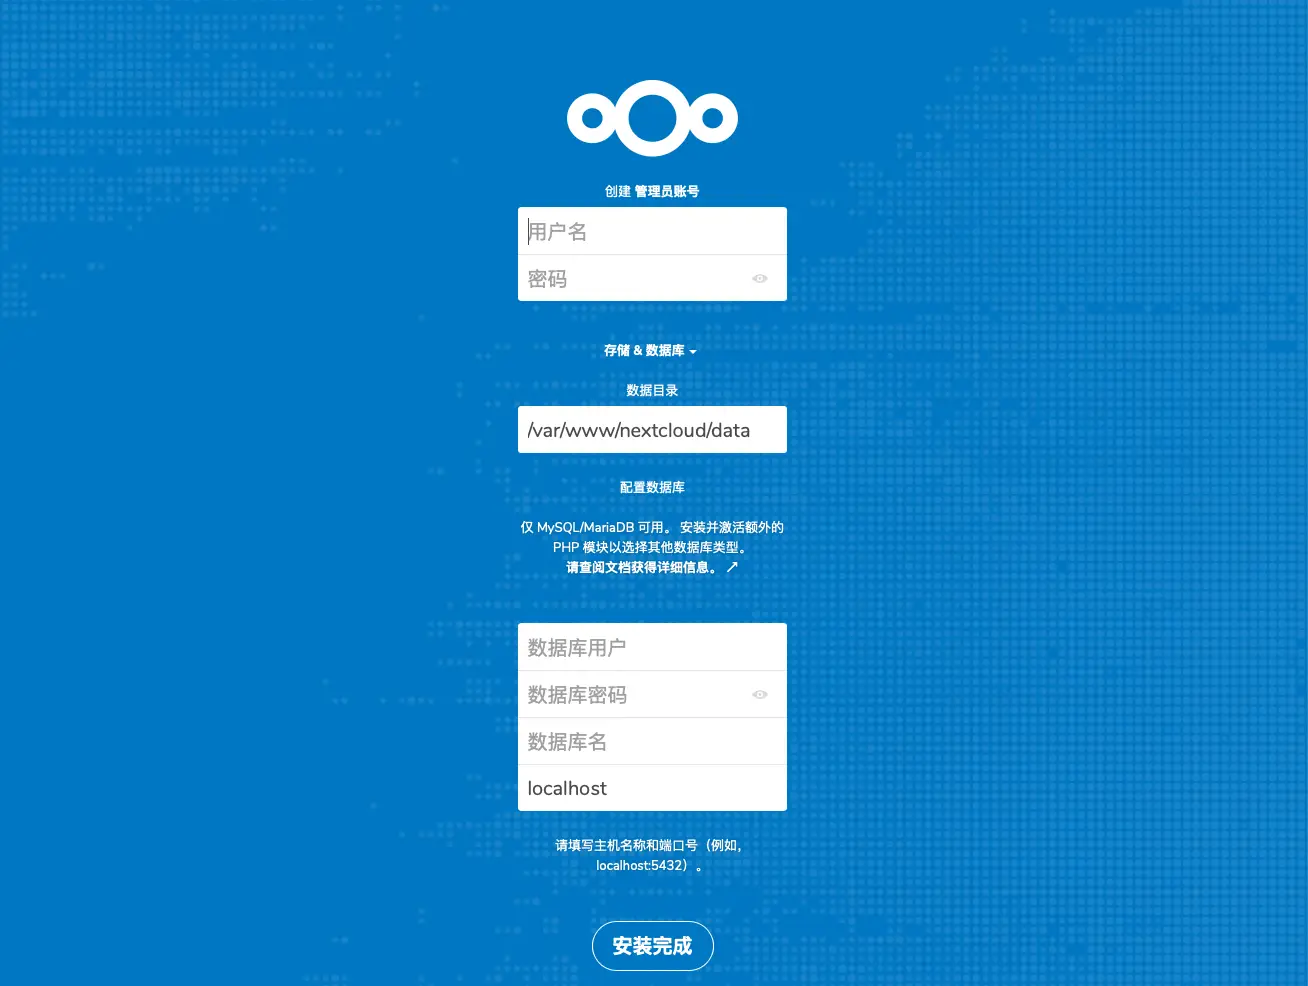
Open your browser and visit the network address configured in Caddy (e.g., next.yourdomain.com) to access the initial setup page. Follow the instructions to set up the NextCloud admin account, user directory, PostgreSQL account nextcloud and its password, database name nextclouddb, and database address localhost.
Click on the Install button to initialize. If all goes well, you will have your own NextCloud in a few minutes.
# Redis Cache
Under the current conditions, file access and uploads in NextCloud are somewhat slow, requiring an external cache for acceleration.
sudo pkg install redis php80-pecl-redis
Adjust the Redis configuration parameters:
# /usr/local/etc/redis.conf
port 0
unixsocket /var/run/redis/redis.sock
unixsocketperm 770
Add the caddy user to the Redis user group:
sudo pw groupmod redis -m caddy
Start the Redis service:
sudo sysrc redis_enable=YES
sudo service redis start
Edit the NextCloud configuration file to utilize Redis:
# /usr/local/www/nextcloud/config/config.php
<?php
$CONFIG = array (
  # ...
  'memcache.locking' => '\\OC\\Memcache\\Redis',
  'memcache.local' => '\\OC\\Memcache\\Redis',
  'redis' =>
  array (
    'host' => '/var/run/redis/redis.sock',
    'port' => 0,
  ),
);
# Optimizing NextCloud
For public use, it is recommended to use HTTPS. Obtain an SSL certificate through Caddy and enable HTTPS mode in the NextCloud configuration file; also, set the default time zone in the configuration file:
# /usr/local/www/nextcloud/config/config.php
<?php
$CONFIG = array (
  # ...
  'overwriteprotocol' => 'https',
  'default_language' => 'zh',
  'default_locale' => 'zh-cn',
  'default_phone_region' => 'CN',
);
# Out with the New, in with the Old?
RIP
NextCloud on FreeBSD
2021.11.21 - 2021.12.04
Two weeks ago, I joyfully downloaded the NextCloud client on my iPhone 13, backed up all my album photos, and it felt great to have a backup.
Today, two weeks later, my NextCloud has permanently left me (at least until I reinstall the operating system).
The reason is that while testing the Caddy rc configuration file, I ran sudo chown caddy .*, which mistakenly set all files and directories in /usr/local/etc to the caddy user. Now, when I open my NextCloud, all I see is a page empty of 403 errors.
Out with the new, in with the old?